Easy Homemade Hamburgers and Potato Wedges

By Corinne

IMG_3025

Serves: 4 

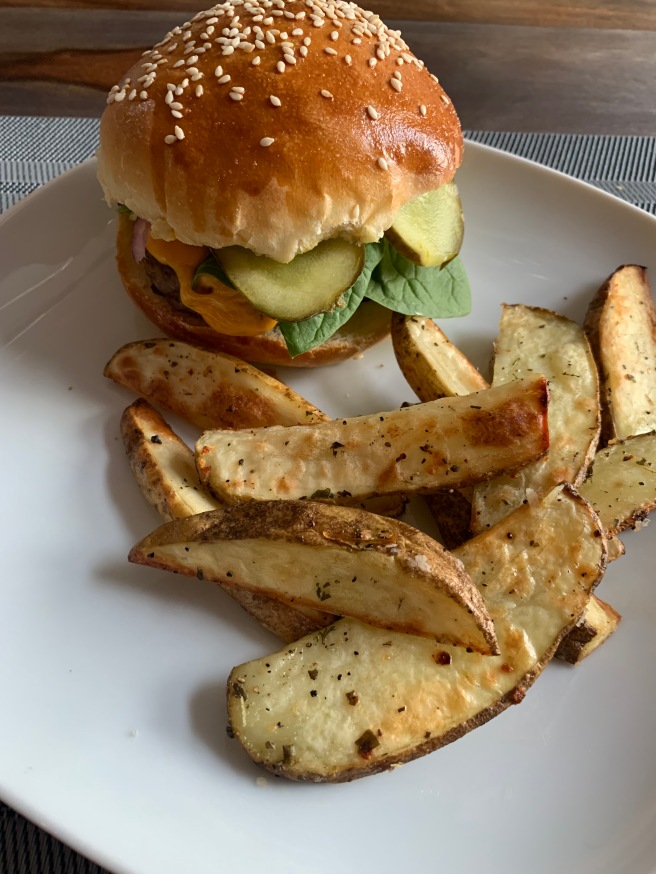
We love burgers around here. I love them on the BBQ in the summer, but most of the time I just pan fry them as I’m definitely a fair weather BBQ cook. This is a basic recipe that is an easy introduction to homemade burgers.

I made a video for my hospitality class during the COVID19 learning at home time to help them. It is available here if you want some video instruction – but remember that the audience was my students, and it is by no means a ‘professional’ quality video. I made it for my kids to help them out a bit because some of them wanted to keep cooking even though we weren’t in class.

Oven 450F

Wedges

You will need:

  • 4 medium/large potatoes
  • 1 tbsp olive or canola oil
  • 1 tsp of your favourite spice mix *suggestions in the FAQ at end!
  • Salt and pepper depending on spice mix used

Cut the potatoes into wedges by cutting first in half, then angling your knife to make a wedge. Spread wedges in a single layer on a baking sheet. If you are worried about sticking to your pan, parchment paper is your friend. 

Sprinkle fries with oil, spice mix, salt and pepper. If the spice mix you are using contains salt, you may not want to add additional salt 

Cook wedges in a preheated 450F oven. Roast for 12-15 minutes and then flip. Roast an additional 12-15 minutes until wedges are golden. Cooking time will vary depending on how thick you have cut your wedges. 

Burgers

You will need:

  • 4 buns
  • Toppings and condiments of your choice
  • 1 lb ground beef *see FAQ
  • ¼ small onion (about 1 tbsp grated)
  • 1 clove garlic 
  • ½ tbsp of your favorite spice mix *see FAQ
  • Salt and pepper (omit salt if your spice mix contains salt)
  • ½ cup bread crumbs (I like panko bread crumbs)
  • A few dashes of worcestershire sauce if desired

In a bowl large enough to mix your ingredients, add your ground beef. Using a fine grater, grate the onion and garlic onto the ground beef. Sprinkle spices, salt, pepper and bread crumbs over ground beef. Mix with your hands until thoroughly combined, but try to work quickly and not overmix.

Divide beef mixture into 4 equal pieces. Shape into a ball, then flatten between your palms. Use your thumb to press the edge so that it is even (see video). Burgers should be about 4 inches wide and of even thickness. Add a few dashes of worcestershire sauce to each patty if desired. 

Heat a large non-stick pan over medium heat. If you are using lean ground beef, add 1 tbsp of oil to your pan once it is hot. Burgers should sizzle when they hit the pan. Pan fry until cooked through-3-5 minutes per side. You can cover your pan with a lid for more even and faster cooking – if you don’t have a lid, you can use a large plate. Add cheese when burgers are cooked or almost finished cooking. Burgers are cooked when juices run clear, when meat is no longer pink in the middle, and when the internal temperature is 165F. 

FAQ

Should I use regular or lean ground beef? 

Whatever you usually buy. Lean ground beef is around 15-20% fat while regular is around 35% fat. If you use lean, you may need to add a bit of oil to your pan and it will be more important to make sure that you don’t overcook your burgers and make them dry. Regular ground beef gives you a little more ‘overcooking leeway’- as in, if you do overcook them, you will probably still end up with a burger that isn’t too dry. 

Oh no! I had my pan too hot and now my burgers are not cooked but kind of burnt- what do I do? 

You can finish cooking them in the oven at 450F – this will keep the outside from browning too much more while still cooking the inside. 

I’m celiac or watching carbs, can I omit the bread crumbs?

If you are celiac- I would recommend substituting with your favourite gluten free bread crumbs. Bread crumbs in burgers and meatballs aren’t just there as a ‘filler’,  they give your burgers a lighter texture and help keep them juicy. If you want to totally omit the bread crumbs you can, but your burgers will be more dense- so make sure you don’t overwork them when you are mixing in the spices and shape your burgers. 

What can I use for spice mix? 

Spice mix for burgers or fries

In Thunder Bay there is an awesome local company called ‘Crazy Good Spices’ that has some great spice mixes available at most of our local grocery stores that I love using on burgers and fries. My favourites for burgers and fries are “Grace’s Favourite” and “BBQ Rub”

You can also make your own! 

Simple Fry Seasoning

  • 1 tbsp paprika
  • 1 tbsp garlic salt 
  • 1 tbsp onion salt

Whisk together, store leftovers in a sealed container. 


Kick it up a Notch!

  • 2 teaspoons onion salt
  • 2 teaspoons paprika
  • 2 teaspoons dried parsley
  • 1 teaspoon garlic powder
  • 1/2 teaspoon dried oregano
  • 1/2 teaspoon dried thyme
  • 1/2 teaspoon dried basil
  • 1/2 teaspoon black pepper
  • 1/4 teaspoon cayenne pepper

Whisk together, store leftovers in a sealed container.

Mixed Greens with Navel Orange and Feta

By: Julie

Serves 3-4.  Easily doubled

Time:  10 min

This is my go to salad when I run out of things.  I usually always have an orange kicking around, although I’ve also used apple, pear, and grapes.  All are equally delicious.  Use what is in season.  The dressing is light, sweet, and tangy.  Be sure to taste it and adjust to your liking.  Try adding some grilled chicken or crispy prosciutto to make this a meal.

20160423_173518

You Will Need:

For The Dressing

  • 1 tbsp lemon juice
  • 1 tbsp honey
  • 1 tbsp water
  • 1 tbsp olive oil

For The Salad

  • 3/4 cup english cucumber, sliced and quartered
  • 1 navel orange
  • 1/4 cup red onion (optional) halved and sliced thin
  • 4 cups of mixed salad greens.  Choose something that has a bitter green or add some radicchio to balance the sweetness.
  • 1/4 cup of toasted hazelnuts, chopped (optional)
  • 1/3 cup feta cheese, crumbled.

Mix the dressing ingredients together in a small plastic container with a lid.  Shake until completely mixed and taste.  Adjust if necessary.

Toast and chop nuts if using.  Slice peel and pith off of the navel orange, slice into quarters, and slice each quarter into 1/4 inch slices.

Toss greens with dressing until thoroughly coated.  Depending on your greens you may or may not use all the dressing.  Add cucumber, nuts, onion, and orange.  Toss.  Top with feta cheese and serve.


Green Chili

By Corinne

This recipe is part magic of social media and part the magic of finding a use for some of those end of season green tomatoes.

I joined facebook years ago and played a silly game that requires a lot of ‘friends’ so ended up adding a bunch of random people who also played the game. After a while, as these things tend to, it got boring and I deleted the vast majority of people who I didn’t really know and had added only for the game. 

However, a few people I had engaged with due to similar interests or just because they seemed like really interesting people and we are still friends. One of them was a lovely Romanian American immigrant who lived near Washington D.C.  We had a few conversations about cooking and this chili is the result of one of them. She was dating a man who was into chili competitions. This chili is probably nothing like the one she told me about- as her version calls for only green hatch chilies- which sadly I have never seen in Thunder Bay as well as no beans or several of the other ingredients here. 

I loved the idea of a green chili and substituted with as many green ingredients as I could- including a use for the glut of green garden tomatoes that always seems to be around at this time of year. If you’ve never had poblano peppers before, they are a mild pepper. In Thunder Bay you can very occasionally find them fresh (always horrendously overpackaged in on a styrofoam tray wrapped in plastic) but you can pretty reliably find them already roasted and canned at Metro.

Like most chili, this freezes well if you aren’t feeding a crowd the day you make it.

IMG_3493

Time: prep 1 hour(less if you’re not watching tv…) cook time 6-8 hours

Makes: a lot- fills my 4 quart(3.8L) slow cooker

Ingredients 

  • 2.5-3 lb boneless pork rib roast
  • 2.5-3 tbsp cumin
  • 2 tbsp coriander 
  • 1 tbsp coarse salt 
  • Generous grinds of pepper
  • A few tbsp neutral oil 
  • 1 large onion + 1 large leek- or an extra half an onion 
  • 1 stalk celery 
  • 1-2 jalapeño peppers (more if you like it hot)
  • 5-6 poblano peppers** (1 can whole whole poblano peppers 430g(15 oz) drained weight) 
  • 4-6 cloves of garlic 
  • about 7 cups chopped green tomatoes 
  • 1 540ml(19 oz)  can black beans drained and rinsed
  • 1 127ml can green chilies
  • 355 ml beer (or water)

Fresh cilantro, lime wedge and sour cream to finish 

** If using fresh poblano peppers- blacken them either on the bbq or the broiler setting of oven. Let cool, peel off skins then chop. 

Cut pork roast into approx 1 inch pieces and lay out on a cookie sheet. Season with cumin, coriander, salt and fresh ground pepper. 

Put 1-2 tbsp oil in a heavy bottomed frying pan (cast iron if you have it) over medium high heat. In batches,  brown pork pieces on all sides. When all pork is finished, add to slow cooker. As it will finish cooking in the slow cooker, don’t worry too much about whether individual pieces are cooked.  Deglaze pan with about half of the can of beer or with about ½ cup of water. Let this liquid reduce by about half and then add to your slow cooker.

Chop onion, garlic, celery, jalapeño and add to slow cooker. Add beans and canned green chilies to slow cooker. 

Chop green tomatoes and then either using an immersion blender or a food processor pulse until blended and add to slow cooker. You will notice that the 2 cups of chopped tomatoes reduces to about 1.5 cups once blended. Continue blending tomatoes, in batches if necessary. 


Cook in slow cooker on low 6-8 hours. Serve with sour cream a wedge of lime and fresh cilantro. Delicious with crusty garlic bread. 

IMG_3492


Blueberry Crisp

By: Julie

Serves – 6…. or 4 if you’re very generous.  I mean, or one if you’ve had a really REALLY bad day.

Time:  10 min plus 1 hour chillin, plus 50min bake time.

I have a sweet tooth.  Not a European Baklava kind of sweet-tooth – with the sugar topped with sugar and some sugar on top, or a French Macaron kind of sweet tooth (although those are lovely in moderation), but a buttery rich sort of sweet-tooth.  And when that buttery sweetness includes fruit, well, that is heaven.  It’s important to note here that its BLUEBERRY SEASON!  The best day after Christmas and that day where they sell the giant fatty doughnuts filled with jam.  All these photos were taken in the dark because the only time I have to actually bake is when all the children are in bed.  Just picture something lovely and sunny like.

berries.jpg

The magic here comes from the generous amount of brown butter in the crumble.  It’s important.  Don’t worry, the do-gooder anti-oxidents in the blueberries totally make up for the gluttony of the butter.

I like to use a deep dish 2.5 quart baking dish for this but use what you have.

blue cooked

You Will Need

For The Crumble

  • 1/2 cup quick oats
  • 1/2 cup brown sugar
  • 1/2 cup flour
  • 1/2 cup butter

For The Filling

  • 4 cups fresh blueberries – the smaller wild variety are best but use whatever.
  • 1/4 cup maple syrup
  • 2 tbsp flour

In a small pot, heat the butter over medium heat until golden brown.  It should smell nutty when it’s ready.  Chill in the fridge until solid – about an hour.  If you’re me, you can fold a million loads of laundry while you’re waiting.

Combine the flour, oats, and brown sugar in a medium bowl.  Cut in the browned butter with a pastry blender until it has a course crumbly texture and put aside.

Combine the blueberries, 2tbsp flour, and maple syrup in the baking dish.  Add the crumble on top and place in the oven for 50 min or until the crisp is brown.  Remove and allow to cool slightly.  This is best served warm with vanilla ice cream.

blue serve


Sour Cherry Jam

By:  Julie

Makes:  3 500ml pint jars (I used 250ml with the same head-space with good results)

I really love canning.  I love taking something that is grown locally, at the peak of its season, and preserving it in pretty little jars that I can share with my friends.  I mean, well some of them make it to my friends.  The strawberry jam that I made earlier it went nowhere, except my stomach.  We’ve just finished up cherry season here, and if you’re lucky, you can grab yourself some fresh sour cherries.  I prefer these for baking and canning to their dark, sweet counter-parts.  I made a pie from sweet cherries once and it tasted like cough medicine.  Sour cherries give you a tart finish that is pleasing however you want to use them.

Corinne once sent me a blog post, and then a book, by the lovely Marisa McClellan.  She makes small-batch canning wonders that are easy to reproduce and taste amazing.  The recipe here comes from her book, Food In Jars, and is by far my current favourite.

20190825_163139

For her Sour Cherry Jam recipe, Marisa likes the cherries to the sweet tarts of her childhood.  I think it tastes like heaven.  Pair it with cream cheese on toast, you will not regret it.

You Will Need:

  • 6 cups of pitted and mashed sour cherries (I was lucky enough to find some fresh ones already pitted.. sort of.. they were sweetened with a bit of sugar to keep them fresh and I was worried about to much sugar in this recipe but it was fine.  I’m all for saving steps).
  • 3 cups of granulated sugar
  • 1 packet of liquid pectin

I always recommend you follow the safe canning practices available from pretty much anywhere on the internet.  We will use a water-bath method here.  That being said, if your preserves start looking or tasting off, don’t hesitate to discard them.  I’ve never had anything go bad on me but there’s always a first time.

Prepare a boiling water bath for your clean jars and place them inside.  The lids can go in a saucepan over low heat to activate the sealer, you don’t want to boil them, just very hot water.  You want them to be hot when you put them on the jars.  You want to make sure they boil for at least 10 min before ladling in your jam.

Combine the cherries and sugar in a large, non-reactive pot (stainless steel… don’t use your cast iron here folks… your jam will taste like cherry-flavoured pennies).  Bring the cherries to a rolling boil then reduce heat and simmer for at least 20 min, skim the foam off once in a while.  Add the pectin and boil for another 5 min.  Melissa says you want it to look like molten lava.  You will see a change in viscosity, but it won’t “set” until it’s cool so don’t panic if you’re a first time jam maker.  It will be sort of the consistency of that fake maple syrup they try to sell you in the grocery store, or corn syrup.

Remove the pot from the heat and ladle into hot jars and then stir with a wooden spoon to ensure there are no large air pockets.  Center the sealers on and apply the rings, turning until you just meet resistance (you want the air to escape while you are processing… if the lids are too tight your jars won’t seal).  Process in boiling water for 10 min.  Note:  the clock starts when the water is boiling after adding the jars.

20190805_165130


Overnight Oats – Rhubarb Edition

By Julie:

Time:  10min plus 4 hours in the fridge

Serves:  4 individual jars

If you asked me what my favourite ingredient to cook with is, it’s probably rhubarb.  It’s pretty, it’s tangy, it’s easy to grow, and almost everything I make with it is DESSERT!  (Except the bbq sauce, coming soon to a blog post near you).

20190514_130957

Most days, we eat overnight oats for breakfast.  They’re nutritious, they’re fast, they’re make ahead, what’s not to love?  Today I was making a Rhubarb Custard Pie and I had a leftover cup of Rhubarb so I put it in the oatmeal.  What’s the worst that could happen?  There is no “worst” scenario here.  There is only awesome.  Awesome sauce Rhubarb Oats.  Give it a go, you’ll love it.  This is “cooking” at it’s easiest.  Without the cooking part.

20190514_135553

You Will Need:

  • 1 cup of Rhubarb – chopped
  • 1 tbsp butter (optional)
  • 4 tbsp maple syrup (the real stuff)
  • 1 heaping cup of rolled oats ( not the quick cooking kind although it will work in a pinch)
  • 2 tbsp of chia seeds
  • 1/2 cup plain greek yogurt (if you use a sweetened yogurt be sure to cut the syrup)
  • 1 and 1/2 cup water
  • 1/4 tsp fresh ground nutmeg

In a small sauce pan, saute the rhubarb in the butter over medium heat until its very soft, about 5 min.  Meanwhile, combine all the other ingredients in a large bowl.  Add the rhubarb when it is soft enough and mix thoroughly.  Divide into your 4 favourite jars or containers.  I like to use my good ‘ole bernardins, but whatever you have, even a plastic container, is fine.  Drizzle with maple syrup because it’s delicious.  Place in the fridge for a minimum of 4 hours but it’s better overnight.  I like to heat mine in the microwave before eating but it’s perfectly delicious cold.

20190520_160533

Building a Levain or Sourdough Starter

By: Julie

Makes:  1 batch of Levain natural yeast bread starter

Time:  minutes a day for 5 days

This is a lesson in building a basic sourdough starter, also called Levain.  This is the Ken Forkish method from Flour, Water Salt, Yeast.  It is not the only way, merely one that I have found to be easy to make, and reliable.  I’ve built it from scratch 5 times now and it’s produced the same results every time.

You will learn that starters are not as hard as they seem.  By smelling, tasting and touching you will learn when your starter is too active and needs to be cooled, or needs additional flour or heat.  A warmer environment makes for a more active starter, and more sourness in your sourdough so be prepared to go through a learning curve as you adjust your starter to your environment and your baking needs.

You will never feel more accomplished than immediately after you take your first successful loaf of levain bread out of the oven.  I promise, if you like sourdough than this is worth the effort.  If you have the time you can take a look at some of the widely researched health benefits of eating fermented dough vs a commercial yeast bread.  Even some people who have gluten sensitivity find they can tolerate a fermented dough, but I am not a health professional.  Do your research.  What I can tell you is that it’s delicious and it keeps for up to 5 days on your counter, which is more than I can say for a home-baked commercial yeast bread that has no preservatives.

You will build your levain over a 5 day period, day 5 being the day you will mix your first dough for your first levain bread (or store your starter for later use).  I have tried this both with white and whole wheat flour and I recommend whole wheat.  There is more nutrients to feed your yeast and you will have a more active culture.  If you are making a white only levain you need a warm environment, over 80F, for best results.

You will need:

  • A 5 or 6 quart bowl or tub with a snug fitting lid
  • A kitchen scale that measures grams
  • digital thermometer
  • 2500g of whole wheat flour
  • 500g of white flour


Day 1

Sometime before noon feed your levain.  If you miss your deadline, it’s not the end of the world.  Your bread may turn out more sour.  Feed it a little earlier the next day or add extra days to feed before making your bread.  If you miss a whole day you will end up with some boozy alcohol scented bread which can have some unpleasant flavors.  Set an alarm on your phone.  I was able to feed quickly in about 5 min from start to finish before work with no problem.

You will Need:

WEIGH YOUR LEVAIN BOWL BEFORE STARTING AND WRITE IT DOWN!

500g of whole wheat flour

500g of water at 90F (If your house is below 70F, then use warmer water, about 95F).

Add to your bowl and mix by hand until there is no dry flour.  It will be like thick dough.  Leave exposed to the air for an hour or two and then cover and store at room temp.  Somewhere where it’s consistently 75F would be ideal but as long as it’s over 70 you will be successful.  In the beginning I recommend paying attention to the temp of your mix and surrounding environment and how that impacts the look, smell, and taste of your mix.  If your house is super cold, you can store your levain in the oven with the light on.  But it needs to be monitored because you may have to heave the door ajar to prevent your levain from getting too hot.

20190109_150329

Day 2 – sometime before noon

When you take the lid off your levain you will notice a perfume that smells sort of like leather.  This is good.  Your levain should be noticeably runnier than when you put the lid on and have bubbles.  Bubbles are life!

Throw away about three quarters of the mix (just scoop it out with a wet hand into the trash – although this is a compost-able mix if you can get it there without making a mess).

Add 500g whole wheat flour

500g of 90-95F water and mix with a wet hand.

Leave uncovered for 1 to 2 hours.  It is important to note that I shortened this because I had to leave for work so my exposure was only about 30min.  Everything was fine.

Cover and put back into your warm location.

20190110_135705

Day 3

Your levain should now be bubbly, have some structure (a sort of web-like stickiness and some stretch from the gluten), and it should have a leather smell.  Throw out three quarters and add:

500g of whole wheat flour

500g of 90-95F water.

Mix using a wet hand until incorporated.  Leave uncovered for 1 to 2 hours then cover and put back into your warm spot.  Today is the turning point.  If you check it before bed it will have a sour porridge smell.  Don’t worry.  It gets better.  Smelling and tasting through out the process is important.  Observation is the key to repetition and success in a changing environment.

20190111_120013

Day 4

The levain should have doubled in size and be very bubbly.  It will be smelling fruity and pleasant.

Today needs accuracy.  You will be prepping your levain for mixing tomorrow.

Throw away all but 200g.  Your final weight should be the initial weight of your bowl plus 200g of levain.  The bowl will be almost empty but all is well.

Add 500g of whole wheat flour

500g of water 90-95F.  Cover and put in a warm place.

20190112_114907

Day 5

Success!  You should now have enough happy yeast to use in Pain De Campagne  

How you feed your bread today will depend on what recipe you are using.  Most sourdough recipes will have instructions for how to feed your starter on mix day.

For levain breads from Flour Salt Water Yeast:

Sometime between 7am and 9am:

Throw away all but 150g of the mix.  Add the following:

400g of white flour

100g of whole wheat flour

Mix with hand until just incorporated.  Cover and let rest in a warm place.  By mid afternoon your levain should be ready to use in your final mix!

20190113_154833

Here’s what it looks like in the final dough!

20190113_160608

And if you have done it right, here’s what you get when you’re all done:

This is Pain De Campagne.  You can find the recipe for it here:

Drop us a comment and let us know how it goes, we want to see your results!

pain de campaigne 2

Pain De Campagne – A levain bread

By:  Julie

Serves:  2 beautiful loaves

Time:  3 days.  Clear your schedule.

Levain breads (the French word for sourdough) are not for the faint of heart.  You cannot make this in an afternoon – for it is a flower that needs planning and love to blossom...  Enough poetry.  It’s time consuming, and may drive you slightly crazy, but I PROMISE -you will be so damn proud of yourself when you are done that you’ll want to do it again. Immediately.

This recipe assumes that you already have a sourdough starter.  If you don’t, stay tuned because I will include levain building in my next post.  This recipe and instruction is the Ken Forkish method from Flour Salt Water Yeast, a book that I highly recommend if you are serious about doing this.  It becomes second nature after a few practices but you’ll find it a whole lot less intimidating if you read this book first.  A small investment to save you stress later.  This is not a paid endorsement, I just really like his book.  This method has never failed me and his instructions are so detailed I felt in control the entire time.  Corinne mentioned that he wastes a lot of flour building his levains, which may be unnecessary, but once you have the levain built the waste is minimal and still cheaper than buying a good loaf of bread.  Keep in mind, people have written entire books about this and I am condensing it into 1 post.  Read through the instructions several times before starting – and read each step again before completing.  It’s not hard, but it is precise.  It’s a 3 days process so make sure you have some time when you’re going to be around the house and plan ahead so you are not rushed.

The Steps Are: 

  1. Wake Starter – Day 1 am
  2. Feed Levain – Day 2 am
  3. Autolyse (hydrate flour) – Day 2 afternoon
  4. Mix – Day 2 afternoon
  5. Fold – Day 2 early evening
  6. Rise – Day 2 evening
  7. Shape – Day 2 late evening
  8. Proof overnight in fridge – Day 2 overnight
  9. Bake – Day 3 am.

Before starting you’re going to need a few things.  Not fancy, there is no need and unless you’re going to do this all the time probably not worth the investment.

  • 2 wicker baskets – or not.  I used plastic bowls lined with linen tea towels.  Just make sure you use something medium size-ish that has a tight fitting lid.  It will save you trying to wrap it with plastic wrap and losing your mind later.  When I created this post I didn’t have baskets.  Now that I do, I use them, but place them inside the same plastic bowls to place in the fridge to rise.  It’s just easier.  You could also use glass.  I have not used stainless and have no idea if the bread would behave the same or different so if this is something you try, leave a comment and let readers know about your success!
  • Whole Wheat Flour – all the bread I make has at least some portion of whole wheat.  For one, it’s good for you, and because it’s good for you, it’s also good for your wild yeast!  They will feed faster and work harder because of the whole wheat content in your loaf, meaning you will need less “help” from commercial yeast depending on what loaf you are making.
  • White Flour – All of the bread I make has at least some portion of white flour.  It is light and easily leavened making for more delicate bread.
  • Kitchen scale.  ESSENTIAL.  If you measure a cup of flour and I measure a cup of flour I GUARANTEE you they will be different every time.  I cannot stress this enough.  In the world of bread accuracy is your best friend.  You’ll want something that can weigh up to 2 Kg and as small as 1g.  Digital is easy.
  • Kitchen thermometer.  Temp is important here.  You need to know both the approximate temp of your room and the temp of the water you are adding to your mixes.  It will help with repeat-ability and will help you troubleshoot if something goes wrong.
  • A medium container with a lid to feed your levain.
  • A 6 quart (or larger) container for final dough.  It needs a lid.  The first time I made this I used my crock pot insert with a lid.  It worked like a charm.  Be creative.  Use a small clean rubbermaid tote if you have it.  Shape doesn’t matter too much, just the lid.  I have a friend that uses a small rubbermaid lunch cooler with success.
  • A dutch oven with lid.  Warning – I used an enamel one and it’s taken a beating over time.  If you have a seasoned cast iron one use that.  If you don’t have a dutch oven, it works perfectly fine on a stoneware pan or a pizza stone.

Wake Up Your Levain – 2 days before baking

I have just taken mine out of the fridge Friday morning at 9 am.   I will weigh my levain bowl and add 200g of levain, throwing the rest away.  Try to keep as little of the water out of it as possible and just scoop the levain.

Make sure you weigh your bowl before starting! My bowl weighs 130g.  I chose one with a lid to make life easier.

image

Then I add 200g of levain.

image

Then I add 100g of whole wheat flour.

image

Then 400 of white flour.

image

In winter add 400g of 95f water.

image

NOTE: If it’s summer and warm in your house add 90F water instead.

image

Now mix until combined with your hand.  You want to use your hands (clean ones please), you’re adding yeast to what is already present on the flour.  This really will be your very own bread, and will taste like no other.

image

image

Cover and put in a warm place overnight.  If your house is 65F or cooler try putting it in your oven with the light on.  The light will keep the oven warm.  Be sure to check that it isn’t too hot in there periodically.  I have to leave the door ajar a bit.

image

Saturday morning 9 am
image

Your levain should now look something like this. You will now do your last feeding before mixing the dough later this afternoon.

Feed levain 9 am Saturday

Discard all but 100 g. The will only be a little left.
image

Add 100g whole wheat flour
400g white flour
400g water at 90F in winter, 85f in summer
Mix with your HAND
Cover and let rest 6 to 8 hours

image

Continue reading

Leftover Cranberry Sauce Muffins

By:  Julie

Servings:  12

Time:  10 min prep, 20 min cooking

My favourite part of Christmas dinner is pie, followed closely by turkey with cranberry sauce.  So we make a LOT, because after the main event comes the glorious Turkey and Cranberry sauce sandwich on lovely fresh bread.  This year, due to a limited number of leftovers (and the fact that I have mostly given up bread), we actually had leftover sauce.  Now, the options for such a prize are many and varied; like freezing it for the next time you have a chicken or turkey dinner, just eating it with a spoon like a gluton because it’s freaking delicious, spreading it on toast because it is essentially jam, throwing it in a saucepan with some balsamic and some pork chops, it really is amazing stuff.  However, I’m out of healthy snacks for my ravenous family and I really, really need some carbs in my life. So muffins it is!  Now time for some notes.  Your homemade sauce is likely different from everyone elses.  If it’s runny you will need to add another half cup of flour here.  If it’s sweet you may want to cut down on some of the sugar.  This is a fairly forgiving recipe so whatever you make will likely be edible and probably delicious.  If you don’t have a full cup of cranberry sauce, just throw some dried cranberries in there.  Almonds would be good too!

It is important to note that out of all the muffins I have made, maybe a hundred different kinds, these might be my favourite as far as flavor goes.20190107_095927

You will need:

  • 1.5 cups of wheat bran
  • 1 cup of all purpose flour
  • 1.5 tsp baking powder
  • 1 tsp of baking soda
  • 1/2 tsp salt
  • 1/3 cup of unsweetened applesauce
  • 1/4 – 1/2 cup of maple syrup (the real stuff) depending on the overall sweetness of your cranberry sauce
  • 1 cup of plain greek yogurt.  Feel free to use vanilla here, just cut back on the maple syrup
  • 1 egg
  • 1 cup of leftover cranberry sauce

20190107_100409

Preparations:

Preheat oven to 375F.  Grease a 12 cup muffin tin or line with paper cups if using.  Combine wet ingredients in a medium bowl, combine dry ingredients in a large bowl.  Fold wet into dry until just combined.  Tip – you never want to over mix your muffins.  You’ll let out all the air and they will be smaller and dense!  The batter will be light and sort of spongy as the bran absorbs all that liquid.  You want to leave it for about 5 min to let the bran absorb all that liquid and for the yogurt to activate the baking soda.  Pop them in the oven and keep an eye out.  The tops will get a lovely golden brown.  Bake for 18 min and insert a toothpick to check for done-ness.  It should come out clean.  If you are not using paper liners, let cool for 5 min and then remove from pan to maintain that outer caramelization because, well, yum.  Cool completely on a rack before storing for up to 5 days in an airtight container… but they won’t last that long.

20190107_102736


Oatmeal Chocolate Chip Breakfast Cookies

By: Julie

Time:  20 min

Serves:  15 2-inch cookies

20181216_083619.jpg

While researching nutrition and learning some scary things about processed foods and refined sugar, (come on Julie, you already knew them deep down inside), I vowed to make changes in our nutrition at home for the month of December.  To stave off some of that Christmas gluttony that you KNOW is coming my way.  Mmmmm pie.  And WINE, oh the wine…  Ahem.  Anywho.  My husband and I are loving the veggie infusion.  We feel good, we have more energy –  I wish I could say I’m sleeping better but I have a 4 month old baby, so… no.

You know who’s NOT on board?  My three -and-a-half-thank-you-very-much year-old daughter.  She is a picky eater.  For the first two years I did a decent job with her nutrition.  Somewhere along the line processed foods snuck in there.  A fishy cracker here (fondly referred to as shut-up snacks in our house), a piece of bologna there… and wonders of wonders, the breakfast bear paw.  She eats one every morning before school because, in a moment of desperation, her mother gave her one as a bribe to get her into the car for day care.  And now she has one every day.  On one hand, it’s good that she’s eating because sometimes it’s very hard to get food in her mouth, (She has some tummy issues so I always feel like I’m on the losing end of a war). On the other hand, they are loading with sugar and nothing really good for you and some things that I can’t pronounce and sort of skip over with some guilt when I’m checking labels.  So.  Because of my new vow to feed her good things NO MATTER WHAT, I had to search for a bear paw replacement.  Enter the Oatmeal Chocolate Chip Breakfast Cookie.  I saw these cookies on a fitness blog and I tweaked them a bit to sweeten them, and you know what?  SHE LIKES THEM. You can totally ignore the maple syrup, vanilla, and nuts and these turn out perfectly good.  I’ve also made them with raisins or cranberries and almonds but they tasted too “healthy”.

These cookies also have the benefit of being paleo friendly and gluten-free if such things are important to you.  And vegan/vegetarian as well.  Who could ask for more?

Note:  If you are allergic to gluten you know to check to make sure your oats and chocolate chips are certified gluten free right?  

20181216_083242

You will need:

  • 1 cup quick oats
  • 2 very ripe bananas
  • 1/4 cup chocolate chips
  • 1/4 cup toasted pecans
  • 1 tsp real vanilla extract
  • 1 tsp natural maple syrup
  • pinch of salt

Preheat oven to 350F and grease a cookie sheet.  For coconut oil fans: my mom used this and they stuck to the pan a bit.  I used olive oil and everything was ducky.  Your choice.

Mash the bananas with a fork until smooth.  Add oats, chocolate chips, pecans, vanilla, maple syrup and salt.  Combine well.  Spoon about a tablespoon and a half onto the cookie sheet and lightly press down.  Repeat.  These don’t spread so you should be able to get 5 rows of 3 with ease to get everything on the same pan.  Cook for 15 min until lightly brown on the bottom.  Let cool on the pan for 5 min and then move to rack.  You can eat them warm or wait for them to cool (you won’t).  Feed to tiny children and husband and tell them they are allowed to have cookies for breakfast!  WINNING!